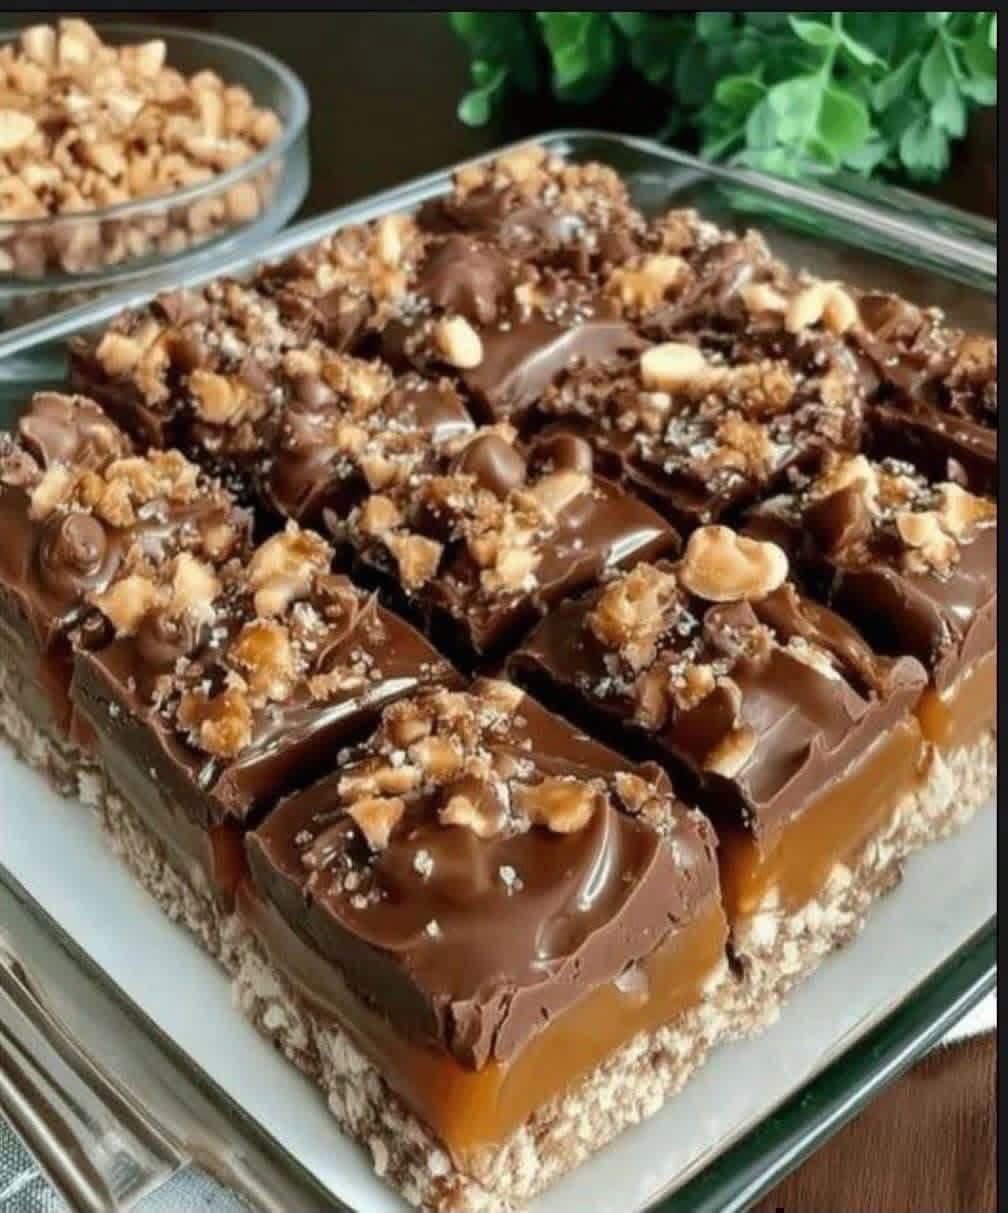
Prepare Your Pan: Line a 9×13 inch baking pan with parchment paper, leaving an overhang on the sides for easy removal. Lightly grease the parchment paper.
Make the Crunchy Base: In a medium bowl, combine the crushed graham crackers (or cereal), melted butter, and granulated sugar. Mix until thoroughly combined and the crumbs are moistened.
Press the Base: Pour the mixture into the prepared baking pan. Using the back of a spoon or your fingers, press the mixture firmly and evenly into the bottom of the pan to form a compact layer. Place the pan in the refrigerator while you prepare the caramel.
Create the Gooey Caramel Layer: In a heavy-bottomed saucepan, melt the butter over medium heat. Add the brown sugar and heavy cream. Stir constantly until the sugar dissolves and the mixture comes to a boil.
Cook the Caramel: Reduce the heat to medium-low and continue to simmer, stirring occasionally, for 5-7 minutes, or until the caramel thickens slightly and reaches a light amber color. Be careful not to let it burn.
Finish the Caramel: Remove the saucepan from the heat. Stir in the vanilla extract and sea salt until well combined.
Pour the Caramel: Carefully pour the hot caramel evenly over the chilled crunchy base. Return the pan to the refrigerator and chill for at least 30-45 minutes, or until the caramel is firm enough to set the chocolate layer on top without mixing.
Prepare the Decadent Chocolate Topping: In a microwave-safe bowl, combine the chocolate chips (or chopped chocolate), butter, and optional coconut oil. Microwave on high in 30-second intervals, stirring well after each interval, until the chocolate is completely melted and smooth. Alternatively, melt the chocolate in a double boiler over simmering water.
Apply the Chocolate Topping: Once the caramel layer is set, pour the melted chocolate evenly over the caramel. Gently spread it to cover the entire surface using an offset spatula or the back of a spoon.
Add the Toasted Topping: Immediately sprinkle the chopped nuts, toffee bits (if using), and a pinch of flaky sea salt over the melted chocolate. Gently press them down lightly so they adhere to the chocolate.
Chill to Set: Return the pan to the refrigerator and chill for at least 2-3 hours, or until the chocolate topping is completely firm.
Cut and Serve: Once thoroughly chilled and firm, use the parchment paper overhang to lift the entire slab out of the pan. Place it on a cutting board. For clean cuts, heat a sharp knife under hot water, wipe it dry, and then slice the bars into your desired size (usually 16-24 squares). Reheat the knife as needed for subsequent cuts. Enjoy your irresistible bars!
Cooking Tips and Variations
For the ultimate crunchy base, ensure your graham crackers or cereal are finely crushed. A food processor works wonders for this, creating a uniform texture that binds beautifully. If using a no-bake base like crushed cookies with butter, ensure you press it down very firmly into the pan; this prevents crumbling when you cut the bars. Chilling the base adequately before adding the caramel is also crucial for stability.
When making the caramel, a heavy-bottomed saucepan is your best friend. It distributes heat more evenly, reducing the risk of scorching. Stirring consistently, especially in the initial stages, helps dissolve the sugar and prevents it from sticking to the bottom. Don’t rush the caramel-making process; allowing it to simmer for the recommended time will ensure it reaches that perfect gooey, chewy consistency rather than being too runny or too hard. If you prefer a truly soft, almost pourable caramel, you can reduce the cooking time slightly. For a firmer, more chewy caramel, cook it for an extra minute or two, but watch it carefully to avoid overcooking, which can lead to a brittle texture. For those who want to skip making caramel from scratch, you can use a high-quality store-bought caramel sauce, but be aware that its consistency might be thinner. If using a pre-made sauce, you might want to gently heat it with a tablespoon of butter to enrich it and help it set a bit firmer.
For the chocolate topping, always use good quality chocolate; it makes a noticeable difference in flavor and melt. Semi-sweet chocolate chips are a popular choice, but feel free to experiment with milk chocolate for a sweeter bar or dark chocolate for a richer, more intense flavor. The addition of coconut oil to the melting chocolate isn’t just for shine; it also helps the chocolate melt smoothly and makes it easier to cut through once set. When spreading the chocolate, work quickly but gently to avoid disturbing the caramel layer underneath. To ensure a beautiful, glossy finish, avoid overheating the chocolate; slow and steady melting is key. If you find your chocolate seized or became grainy, a tiny bit of vegetable oil or more coconut oil stirred in might help revive it, but prevention is better than cure.
The topping is where you can truly personalize these bars. While chopped roasted peanuts and toffee bits are classic, consider toasted pecans, walnuts, almonds, or even a sprinkle of mini chocolate chips. For an extra layer of flavor and crunch, try adding pretzel pieces to the base or sprinkling them on top. A generous sprinkle of flaky sea salt over the chocolate topping is highly recommended; it beautifully balances the sweetness of the caramel and chocolate, creating that irresistible sweet and salty combination that everyone loves. You can also vary the base by using different types of crushed cookies, such as shortbread or chocolate wafers, for different flavor profiles. For a truly decadent twist, consider adding a layer of peanut butter or a thin layer of marshmallow fluff between the caramel and chocolate layers. The possibilities are endless!
Storage and Reheating
These Irresistible Caramel Chocolate Crunch Bars are best stored in an airtight container in the refrigerator. When stored properly, they will maintain their freshness and texture for up to 5-7 days. Keeping them chilled helps to keep the caramel firm and prevents the chocolate from becoming too soft, especially in warmer environments. If you prefer a slightly softer caramel, you can allow the bars to sit at room temperature for 15-20 minutes before serving. However, for optimal structural integrity and a delightful chew, serving them straight from the fridge is often preferred.
For longer storage, these bars freeze beautifully. Once the bars are completely set and cut into individual pieces, arrange them in a single layer on a parchment-lined baking sheet and freeze for about an hour until firm. Then, transfer the frozen bars to a freezer-safe airtight container or a heavy-duty freezer bag, separating layers with parchment paper to prevent sticking. They can be stored in the freezer for up to 2-3 months. When you’re ready to enjoy them, simply remove them from the freezer and let them thaw at room temperature for about 30-60 minutes, or in the refrigerator overnight. There is no need for reheating; these bars are designed to be enjoyed at cool or room temperature for the best texture and flavor.
Frequently Asked Questions
How do I prevent my caramel from becoming too hard or too soft?
The key to perfect caramel consistency lies in the cooking time and temperature. For a soft, chewy caramel, cook it until it just begins to thicken and reaches a light amber color, typically around 5-7 minutes after boiling. If your caramel becomes too hard, it was likely overcooked; next time, reduce the simmering time slightly. If it’s too soft or runny, it was undercooked; try simmering for a minute or two longer. Using a candy thermometer can also help achieve precision; aim for a temperature around 245-250°F (118-121°C) for a chewy caramel. Also, ensure you’re using heavy cream, not milk, as the fat content is crucial for the right texture.
Can I make these bars gluten-free?
Absolutely! To make these bars gluten-free, simply substitute the graham crackers or digestive biscuits in the base with gluten-free graham crackers or a gluten-free crispy rice cereal. All other ingredients (butter, sugar, heavy cream, chocolate, nuts) are typically gluten-free, but always double-check the labels of your specific brands to ensure no hidden gluten-containing additives, especially in chocolate chips or toffee bits.
What’s the best way to cut clean slices?
Achieving perfectly neat slices is easier than you think! First, ensure the bars are thoroughly chilled and firm, preferably for at least 2-3 hours in the refrigerator. Second, use a long, sharp knife. For each cut, run the knife under very hot water for a few seconds, then wipe it completely dry. The warm blade will glide through the chocolate and caramel without dragging or cracking. Make a firm, single cut, and clean the knife after each slice (or every two slices) to remove any sticky residue, which prevents messy cuts. If the knife cools too much, repeat the hot water process.
Can I use a different type of nut for the topping?
Yes, absolutely! The beauty of this recipe is its versatility. While roasted peanuts are a classic choice, feel free to experiment with any nuts you enjoy. Toasted pecans, walnuts, almonds, or even cashews would be delicious. For an extra layer of flavor, consider lightly toasting the nuts yourself before chopping and sprinkling them on top. This enhances their natural oils and deepens their flavor. If you have a nut allergy, you can omit the nuts entirely or substitute them with seeds (like pumpkin or sunflower seeds), shredded coconut, or additional toffee bits for crunch.
For Complete Cooking STEPS Please Head On Over To Next Page Or Open button (>)